Selamat Datang di Mikrotik Routers

silahkan daftar di Mikrotik Routers

Daftarkan akun anda untuk mendapatkan Update yang terbaru tentang mikrotik

Member Login

Lost your password?

Not a member yet? Sign Up!

Minggu, 03 April 2011

Tutorial Web Proxy Mikrotik Blocking Web and Drop Open Proxy

ini contoh untuk menjelaskan kepada anda bagaimana untuk memblok suatu web site dan; memberhentikan download,, saya mempunyai web proxy test package, dan configure mikrotik..
/ip proxy
enabled: yes
src-address: 0.0.0.0
port: 8080
parent-proxy: 0.0.0.0:0
cache-drive: system
cache-administrator: “ASHISH PATEL”
max-disk-cache-size: none
max-ram-cache-size: none
cache-only-on-disk: no
maximal-client-connections: 1000
maximal-server-connections: 1000
max-object-size: 512KiB
max-fresh-time: 3d

sekarang kita buat jadi transparent
/ip firewall nat
chain=dstnat protocol=tcp dst-port=80 action=redirect to-ports=8080

membuat secara pasti proxy kamu,, tidak sebuah open proxy.

/ip firewall filter
chain=input in-interface= src-address=0.0.0.0/0 protocol=tcp dst-port=8080 action=drop

sekarang blok website

/ip proxy access
dst-host=www.blockedsite.com action=deny

itu akan memblok web site www.blockedsite.com kita dapat selalu block dari jaringan yang sama ataupun beda dari giving src-address. itu akan block partikular source address,,

kita dapat memberhentikan download file dalam bentuk " mp3, mp4,exe, jar.....dst..

/ip proxy access
path=*.exe action=deny
path=*.mp3 action=deny
path=*.zip action=deny
path=*.rar action=deny.

coba dengan ini juga...

/ip proxy access
dst-host=:mail action=deny

ini akan memblok kata dari mail 'url
contoh : akan memblok mail.yahoo.com, mail.wanxp.com

Setting Transparent Web Proxy Server di Mikrotik Router OS

Proxy server merupakan program yang dapat mempercepat akses ke suatu web yang sudah diakses oleh komputer lain, karena sudah di simpan didalam caching server. Transparent proxy menguntungkan dalam management client, karena system administrator tidak perlu lagi melakukan setup proxy di setiap browser komputer client karena redirection dilakukan otomatis di sisi server.

Bentuk perintah konfigurasi :
a. Setting web proxy :

- ip proxy set enable=yes
port={ port yang mau digunakan }
maximal-client-connections=1000
maximal-server-connections=1000

- ip proxy direct add src-address={ network yang akan di
NAT} action=allow

- ip web-proxy set parent-proxy={proxy parent/optional}
hostname={ nama host untuk proxy/optional}
port={port yang mau digunakan}
src-address={ address yang akan digunakan untuk koneksi
ke parent proxy/default 0.0.0.0}
transparent-proxy=yes
max-object-size={ ukuran maximal file yang akan disimpan
sebagai cache/default 4096 in Kilobytes}
max-cache-size= { ukuran maximal hardisk yang akan
dipakai sebagai penyimpan file cache/unlimited
| none | 12 in megabytes}
cache-administrator={ email administrator yang akan digunakan
apabila proxy error, status akan dikirim
ke email tersebut}
enable==yes

Contoh konfigurasi
a. Web proxy setting

/ip web-proxy
set enabled=yes src-address=0.0.0.0 port=8080 \
hostname=proxy.routerku.co.id transparent-proxy=yes \
parent-proxy=0.0.0.0:0 cache-administrator=support@routerku.co.id \
max-object-size=131072KiB cache-drive=system max-cache-size=unlimited \
max-ram-cache-size=unlimited

Nat Redirect, perlu ditambahkan yaitu rule REDIRECTING untuk membelokkan
traffic HTTP menuju ke WEB-PROXY.

b. Setting firewall untuk Transparant Proxy
Bentuk perintah konfigurasi:

/ip firewall nat add chain=dstnat
protocol=tcp
dst-port=80
action=redirect
to-ports={ port proxy }

Perintahnya:
/ip firewall nat
add chain=dstnat protocol=tcp dst-port=80 action=redirect to-ports=8080 \
comment= disabled=no
add chain=dstnat protocol=tcp dst-port=3128 action=redirect to-ports=8080 \
comment= disabled=no
add chain=dstnat protocol=tcp dst-port=8000 action=redirect to-ports=8080 \

perintah diatas dimaksudkan, agar semua trafik yang menuju Port 80,3128,8000 dibelokkan menuju port 8080 yaitu portnya Web-Proxy.

CATATAN:
Perintah
/ip web-proxy print { untuk melihat hasil konfigurasi web-proxy}
/ip web-proxy monitor { untuk monitoring kerja web-proxy}

Selasa, 22 Maret 2011

mikrotik untuk para newbie

mau mempelajari mikrotik yang lengkap?
tidak usah repot-repot searched dari banyak media,, atau nge thread di forum mikotik yang terus berulang -ulang di thread kan, membuat para master muak,, atau bosan membahas itu lagi,, ya jujur emang muak,, jika terus mendapat pertanyaan yang sama padahal di searchedkan sudah lengkap,,

dari pada report- report memcari nya, anda dapat mendowloadnya disini
kalo sudah dapat pelajari aja, dan kalo sudah master jangan belagu dan sombong key..

download

Senin, 21 Maret 2011

Setting Billing Hotspot Integrasi Router Mikrotik

Setting Billing Hotspot integrasi Router Mikrotik sangatlah mudah, setalah install mikrotik dengan benar, jalankan aplikasi “Winbox Loader” sehingga anda bisa mengkonfigurasi Mikrotik Router dari Desktop Windows secara mudah dan cepat tanpa harus menghafal command line Mikrotik. Setelah klik dua kali aplikasi Winbox maka akan muncul tampilan sebagai berikut :

Setelah itu klik tanda … maka akan muncul MAC Address Mikrotik yang sedang aktif dalam hal ini klik dua kali Mac Address 00:0B:CD:64:D9:22 dan isikan user admin dan password secara default adalah kosong kemudian klik “Connect”

IP ==> Address List
Klik tanda plus |+| kemudian pada “Address” kemudian isikan nomor IP yang diinginkan misal 192.168.1.110/24 (slash 24 artinya nanti secara otomatis akan mengisi Network dan Broadcast). Kemudian pada “Interface” pilih ether1 dimana ether1 yang akan terhubung dengan Modem/ISP.

IP ==> Route List
Klik tanda plus |+| kemudian pada “Gateway” isikan IP Gateway anda, misal 192.168.1.1 Kemudian klik “OK”

New Terminal
Maka akan muncul tampilan konsole sebagai berikut dan kemudian lakukan ping ke Gateway Internet anda, ketikkan ping 192.168.1.1 Jika berhasil maka akan tampilan seperti gambar di bawah ini dan itu artinya jaringan dari Mikrotik ke Gateway/Modem telah terhubung dengan normal.

Interface ==> Interface List
Ini adalah untuk melihat interface atau Ethernet card yang mana sedang aktif (konek ke jaringan) yaitu pada posisi “Tx” dan “Rx” maka akan muncul trafik xxx bps. Dalam hal ini adalah ether1 sedang terhubung dengan jaringan LAN

IP ==> DNS
Kemudian klik “Setting” pada “Primary DNS” isikan DNS1 misal 202.134.1.10 dan pada “Secondary DNS” isikan DNS2 misal 202.134.0.155 dan jika setelah klik “OK”

New Terminal
Lakukan testing ping keluar yaitu ke internet misal ke google.com dengan mengetikkan perintah ping google.com jika hasil seperti di bawah ini maka koneksi internet anda sudah konek.

IP ==> Hotspot ==> Hotspot Setup

Pada “Hotspot Interface” pilih ether yang mana yang ingin di jadikan untuk hotspot, dalam hal ini adalah ether3 dan jika ada wireless antena anda pilih wireless. Kemudian klik “Next”

Pada “Local Address of Network” adalah Gateway Hotspot anda, kemudian klik “Next”

Pada “Address Pool of Network” adalah Range IP DHCP yang nantinya di berikan ke user hotspot. Anda bisa tentukan berapa range IP inginkan dalam hal ini adalah dari 10.5.50.2 s/d 10.5.50.254 kemudian klik “Next”

Pada “Select Certificate” pilih “none” kemudian klik “Next”

Pada “IP Address of SMTP Server” biarkan kosong kemudian klik “Next”

Pada “DNS Servers” sudah terisi DNS anda dengan benar dan langsung aja klik “Next”

Pada “DNS Name” biarkan saja kosong kemudian klik “Next”

Kemudian langsung saja klik “Next”

Setelah selesai maka akan muncul kotak dialog sebagai berikut kemudian klik “OK”

Kemudian lanjutkan dengan konfigurasi Hotspot Mikrotik agar terkoneksi dengan software Billing Hotspot sebaik berikut :

IP ==> Hotspot ==> Server Profiles ==> hsprof1 (klik 2x)
Dari tab “General” pindah ke tab “Login” kemudian hilangkan tanda centang (uncheck) pada “Cookies” kemudian klik “Apply”

Kemudian pindah ke tab “Radius” dan hilangkan tanda centang (uncheck) pada “Use RADIUS” kemudian klik “Apply” lalu klik “OK”

Radius
Klik tanda plus |+| dan pada tab General beri tanda centang pada service hotspot kemudian pada “Address” isikan IP Address radius server Billing Hotspot (PC Linux) dan “Secret” isikan secret id misal 123457890 sesuai yang anda isikan di Linux, kemudian jika selesai klik “OK”

Agar Halaman Login User Hotspot muncul halaman login Billing Hotspot seperti gambar di bawah ini

IP ==> Hotspot ==> Walled Garden
Klik tanda plus |+| dan pada posisi “Action = allow” pilih “Dst. Address” isikan nomer IP server Billing Hotspot, misal 192.168.1.10 kemudian klik “OK”

Jika selesai lakukan upload file ke dalam mikrotik yang udah di konfigurasi oleh Team software Billing Hotspot

Langkah selanjutnya agar Billing Hotspot terintegrasi dengan Router Mikrotik, anda harus login dulu ke Billing Hotspot Manager. Masukkan username, password dan Security Code dengan benar seperti berikut ini

Setelah berhasil masuk ke Billing Hotspot Manager, masuk Menu Preference ==> Setting Service ==> Pilih /var/www/html/config.client.php kemudian klik “Edit” dan jika selesai klik “Save”

$ipServer=”192.168.1.2”; ==> isikan nomor IP Server Billing Hotspot
$ipMikrotik=”192.168.1.10”; ==> isikan nomor IP Router Mikrotik
$userMikrotik=”admin”; ==> isikan nama user Router Mikrotik
$passMikrotik=”admin”; ==> isikan password Router Mikrotik

Bila tidak bisa di simpan masuk ke Konsole sebagai root di Linux dan ketikkan perintah chmod 775 /var/www/html/config.client.php

Masuk Preference ==> Setting Service ==> Pilih /etc/raddb/clients.conf kemudian klik “Edit” tarik scroll ke baris paling bawah kemudian tambahkan empat baris perintah sebagai berikut dan jika selesai klik “Save”

client 192.168.1.2 ==> isikan dengan nomor IP Router Mikrotik
secret=123457890 ==> isikan secret sesuai di RADIUS Mikrotik
shortname=mikrotik ==> isikan dengan nama label ‘mikrotik’

Masuk Preference ==> Setting Service ==> Pilih /etc/raddb/naslist kemudian klik “Edit”

Bila tidak bisa di simpan masuk ke Konsole sebagai root di Linux dan ketikkan perintah chmod 775 /etc/raddb/naslist

Minggu, 20 Maret 2011

Setting Hotspot Pada Mikrotik

Setting Hotspot pada Mikrotik Router OS sangat mudah dikonfigurasi. Sistem autentikasi hotspot biasa digunakan ketika kita akan menyediakan akses internet pada areal publik, seperti : Hotel, café, Kampus, airport, taman, mall dll. Teknologi akses internet ini biasanya menggunakan jaringan wireless atau wired. Biasanya menyediakan akses internet gratis dengan menggunakan hotspot atau bisa juga menggunakan Voucher untuk autentikasinya. Ketika membuka halaman web maka router akan mengecek apakah user sudah di autentikasi atau belum. Jika belum melakukan autentikasi, maka user akan di arahkan pada hotspot login page yang mengharuskan mengisi username dan password. Jika informasi login yang dimasukkan sudah benar, maka router akan memasukkan user tersebut kedalam sistem hotspot dan client sudah bisa mengakses halaman web. Selain itu akan muncul popup windows berisi status ip address, byte rate dan time live. Penggunaan akses internet hotspot dapat dihitung berdasarkan waktu (time-based) dan data yang di download/upload (volume-based). Selain itu dapat juga dilakukan melimit bandwidth berdasarkan data rate, total data upload/download atau bisa juga di limit berdasarkan lama pemakaian.

Cara mudah setting hotspot pada mikrotik adalah ada 2 (dua) pilihan selain menggunakan teks mode kita juga bisa menggunakan setting wizard dengan menggunakan Winbox Router OS, Langkah-langkat berikut merupakan konfigurasi dasar hotspot mikrotik sebagai Gateway Server. Pertama install Mikrotik Router OS pada PC atau pasang DOM atau kalau menggunakan Rouer Board langsung aja Login = ‘admin’ sedangkan untuk pasword anda kosongin untuk defaultnya.

Masuk ke IP ==> Hotspot ==> Setup

Kemudian tentukan IP lokal hospot yang akan ada gunakan, misal 192.168.10.1 dan Tentukan IP DHCP ke clientnya yang akan anda gunakan, dalam contoh ini adalah 192.168.10.2-192.168.10.255


Untuk SMTP Server sebaiknya anda kosongin saja, Kemudian DNS servernya anda isikan sesuaikan dengan Provider anda, dalam contoh ini adalah DNS1=202.47.78.1 DNS2=202.47.78.9


DNS lokal hotspot anda NEXT saja kemudian pada Hotspot user anda dalam contoh berikut diisi admin password admin123


hotspo


Hotspot Server Profile digunakan untuk mensetting server yang akan sering digunakan untuk semua user seperti metode autentikasi dan Limitasi data rate. Ada 6 jenis autentikasi Hotspot mikrotik yang berbeda dalam profile setting, jenis autentikas tersebut adalah : HTTP PAP, HTTP CHAP, HTTPS, HTTP cookie, MAC address, Trial


Metode autentikasi yang akan digunakan, biasanya cukup menggunakan metode HTTP CHAP


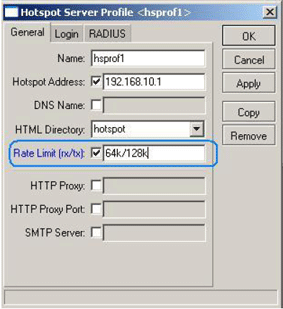
Data rate limitation digunakan sebagai default setting untuk user yang belum di setting bandwidth limit pemakaiannya. Dimana RX adalah Client upload dan TX adalah Client download. Misal setting default data rate di 64k/128k (upload/download)


Hotspot user profile digunakan untuk menyimpan data user yang akan dibuatkan rule profilenya. Dimana didalamnya bisa dilakukan setting firewall filter chain untuk traffic yang keluar/masuk, juga bisa untuk mensetting limitasi data rate dan selain itu dapat juga dilakukan paket marking untuk setiap user yang masuk kedalam profile tersebut secara otomatis.


Hotspot user yaitu nama-nama user yang akan diautentikasi pada sistem hotspot. Beberapa hal yang dapat dilakukan dalam konfigurasi hotspot user yaitu : username dan password, Membatasi user berdasarkan waktu dan paket data yang akan digunakan, hanya ip address tertentu dari ip address dhcp yang ditawarkan atau hanya mengizinkan user untuk koneksi ke sistem hotspot dari MAC Address tertentu saja.


IP Bindings digunakan untuk mengizinkan ip tertentu untuk membypass autentikasi hotpot, ini sangat berguna sekali ketika kita ingin menjalankan layanan server, atau IP telephony dibawah system hotspot. Misal, PC atau Notebook anda untuk dapat membypass hotspot system, dengan demikian anda dapat melakukan browsing tanpa autentikasi

MikroTik RouterOS WEB Proxy

Overview
The MikroTik RouterOS has the squid proxy server implementation.

Proxy server features:

* Regular http proxy.
* Transparent proxy. Can be transparent and regular at the same time.
* Access list by source, destination, and URL.
* Cache access list.

Contents of the Manual
The following topics are covered in this manual:

* Installation
* Hardware Resource Usage
* MikroTik Web Proxy Description
* MikroTik Web Proxy Setup
Monitoring the Web Proxy
Access List
Managing the Cache
* Transparent Mode
* Troubleshooting

Installation
The MikroTik Web Proxy feature is included in the 'web-proxy' package. To install the web-proxy package, upload it to the router and reboot. After successful install of the web-proxy package it should be listed under the /system package print list:

[MikroTik] > system package print
Flags: I - invalid
# NAME VERSION BUILD-TIME UNINSTALL
0 system 2.5.2 apr/24/2002 11:52:28 no
1 routing 2.5.2 apr/24/2002 12:04:34 no
2 web-proxy 2.5.2 apr/24/2002 12:02:52 no
3 ppp 2.5.2 apr/24/2002 11:57:03 no
4 pptp 2.5.2 apr/24/2002 11:57:43 no
5 pppoe 2.5.2 apr/24/2002 11:58:46 no
6 ssh 2.5.2 apr/24/2002 11:54:52 no
7 snmp 2.5.2 apr/24/2002 11:53:10 no
[MikroTik] >

Hardware Resource Usage
The proxy cache can use as much disk space as there is allocated for it. When the system allocates the space for the proxy cache, 1/7th of the total partition (disk) size is reserved for the system, but not less than 30MB. The rest is left for the proxy cache. The system RAM size is considered as well when allocating the cache size. The cache size is limited so, that there are at least 11.1MB of RAM per 1GB of cache.

It is recommended, that at least 100MB HDD is used when running web proxy. Do not try to run web-proxy on a 32 or 48 MB FlashDisk!

MikroTik Web Proxy Description
The web proxy can be used as transparent and normal web proxy at the same time. In transparent mode it is possible to use it as standard web proxy, too. However, in this case, proxy users may have trouble to reach web pages which are accessed transparently.

MikroTik Web Proxy Setup
The Web Proxy management can be accessed under the /ip web-proxy submenu:

[MikroTik] ip web-proxy> ?
HTTP proxy
clear-cache Clear http cache
access Access list
cache Cache access list
print Print current configuration and status
get Get value of configuration property
set Change proxy configuration
export Export web proxy settings
[MikroTik] ip web-proxy>

For web proxy setup, do the following:

* Specify at least one dns server for the router:

/ip dns set primary-dns=192.168.1.1

* Set IP address and port on which proxy will listen for requests:

/ip web-proxy set address=0.0.0.0:8080

* If this proxy has to use another proxy, specify it:

/ip web-proxy set parent-proxy=192.168.1.1:8080

otherwise disable it:

/ip web-proxy set parent-proxy=0.0.0.0:0

* Specify cache administrator's e-mail address:

/ip web-proxy set cache-administrator=support@mt.lv

* Specify hostname (DNS or IP address) of the web proxy:

/ip web-proxy set hostname=proxy.mt.lv

* Enable the proxy service:

/ip web-proxy set enabled=yes

Now it is possible to use this proxy, by setting it as proxy for IE or Netscape.

Web proxy will automatically detect any problems with cache and will try to solve them without loosing any cache data. But in case of a heavy damage to the file system, the web proxy can't rebuild cache data. Cache can be deleted and new cache directories created by the command '/ip web-proxy clear-cache'.

Monitoring the Web Proxy
Use the command /ip web-proxy print to see the current web proxy status:

[MikroTik] ip web-proxy> print
enabled: yes
address: 0.0.0.0:8080
transparent-mode: no
parent-proxy: 0.0.0.0:0
cache-administrator: support@mt.lv
hostname: proxy.mt.lv
status: running
reserved-for-cache: 6782 MB
[MikroTik] ip web-proxy>

Description of the status parameter value:

stopped - proxy is disabled and is not running
rebuilding-cache - proxy is enabled and running, existing cache is being verified
running - proxy is enabled and running
stopping - proxy is shutting down (max 10s)
clearing-cache - proxy is stopped, cache files are being removed
creating-cache - proxy is stopped, cache directory structure is being created
dns-missing - proxy is enabled, but not running because of unknown DNS server (please, specify it under /ip dns)
invalid-address - proxy is enabled, but not running because of invalid address (please, change address or port)
invalid-cache-administrator - proxy is enabled, but not running because of invalid cache-administrator's e-mail address
invalid-hostname - proxy is enabled, but not running because of invalid hostname (please, set valid hostname value)
error-logged - proxy is not running because of unknown error. This error is logged as System-Error. Please, send us this error and some description, how it happened.

Access logs are sent to Web-Proxy-Access logging facility. These logs can be disabled, logged locally or sent to remote address. To log locally:

/system logging facility set Web-Proxy-Access logging=local

Logs can be viewed using /log print command.

Access List

Access list is implemented in the same way as MikroTik firewall rules. Rules are processed from top to bottom. First matching rule specifies decision of what to do with this connection. Connections can be matched by its source address, destination address, destination port or substring of requested url. If none of these parameters is specified, every connection will match this rule.

If connection is matched by a rule, action property of this rule specifies whether connection will be allowed or not. If connection does not match any rule, it will be allowed.

For example:

[MikroTik] ip web-proxy access> print
Flags: X - disabled
# SRC-ADDRESS DST-ADDRESS DST-PORT URL ACTION
0 0.0.0.0/0 0.0.0.0/0 0-65535 .mp3 deny
1 10.0.0.1/32 0.0.0.0/0 0-65535 allow
2 0.0.0.0/0 0.0.0.0/0 0-65535 ftp:// deny
3 10.0.0.0/24 10.9.9.128/28 0-65535 allow
4 0.0.0.0/0 0.0.0.0/0 0-65535 deny
[MikroTik] ip web-proxy access>

Argument description:

src-address - source address of the request
dst-address - destination address of the request
dst-port - destination port of the request
url - the URL of the request. Can be regular expression.
action - (allow / deny) action to take.

Access list, shown above, disables access to any mp3 files for everyone.
Local gateway 10.0.0.1 has access to everything else (excluding mp3 files).
All other local network (10.0.0.0/24) users have access to servers located at 10.9.9.128/28, but, ftp protocol is not allowed for them.
Any other request is denied.

Managing the Cache

Cache access list specifies, which requests (domains, servers, pages) have to be cached locally by web proxy, and which not. The Web Proxy cache access list is located under the /ip web-proxy cache submenu.

Access list is implemented exactly the same way as web proxy access list. Default action is to cache object (if no matching rule is found). By default, one cache access rule is already added:

[MikroTik] ip web-proxy cache> print
Flags: X - disabled
# SRC-ADDRESS DST-ADDRESS DST-PORT URL ACTION
0 0.0.0.0/0 0.0.0.0/0 0-65535 cgi-bin \? deny
[MikroTik] ip web-proxy cache>

This rule defines, that all runtime generated pages (which are located within cgi-bin directories or contain '?' in url) has not to be cached.

NOTE: Objects, which are larger than 4MB, are not cached.

Transparent Mode
To enable the transparent mode, firewall rule in destination nat has to be added, specifying which connections (to which ports) should be transparently redirected to the proxy. For example, we have the following web-proxy settings:

[MikroTik] ip web-proxy> print
enabled: yes
address: 0.0.0.0:8080
transparent-mode: yes
parent-proxy: 0.0.0.0:0
cache-administrator: support@mt.lv
hostname: proxy.mt.lv
status: running
reserved-for-cache: 3398 MB
[MikroTik] ip web-proxy>

If we want all connections coming from interface ether1 and going to port 80 to handle with web proxy transparently, and if our web proxy is listening on port 8080, then we add following destination nat rule:

[MikroTik] ip firewall dst-nat> add in-interface=ether1 protocol=tcp \
dst-address=!10.0.0.1/32:80 action=redirect to-dst-port=8080
[MikroTik] ip firewall dst-nat> print
Flags: X - disabled, I - invalid
0 ;;; Transparent proxy
src-address=0.0.0.0/0:0-65535 in-interface=ether1
dst-address=!10.0.0.1/32:80 protocol=tcp icmp-options=any:any flow=""
src-mac-address=00:00:00:00:00:00 limit-count=0 limit-burst=0
limit-time=0s action=redirect to-dst-address=0.0.0.0 to-dst-port=8080
bytes=118949 packets=2260

[MikroTik] ip firewall dst-nat>

Here, the router's address and port 80 (10.0.0.1/32:80) have been excluded from redirection to preserve the winbox functionality which uses TCP port 80 on the router. More than one redirect rule can be added to redirect more than one port.

NOTE: only HTTP traffic is supported by web proxy transparent mode. HTTPS and FTP are not going to work this way!

Troubleshooting

* My web-proxy does not start. There are error messages in the system log, and the status of the web-proxy is 'rebuilding cache ...'
Problem with underscore '_' in the identity name has been fixed (starting with v2.5.2). It is a good idea, to update web-proxy, if there is newer version available.

* The transparent proxy stops working after 5 minutes
See if you have enough disk space (do not run web-proxy on a 48MB FlashDisk!) and sufficient RAM (10MB...20MB on each GB of proxy cache).

* Can I use transparent proxy feature on a MikroTik router with bridged interfaces?
No. Transparent proxy requires redirection of IP packets by firewall destination NAT. Firewall is not involved when packets are passed from one bridged interface to another. But packets have to be translated by firewall destination NAT for transparent web-proxy to work. So, web-proxy is not going to work in transparent mode between bridge interfaces.

* When I turned on transparent proxy and redirected TCP port 80 to it, my WinBox stopped working.
TCP port 80 is used by WinBox when connecting to the router. You should exclude the router's address:80 from redirection by using rule
'/ip firewall src-nat add dst-address=address/32:80 protocol=tcp action=accept'
BEFORE the redirect rule. Alternatively, you can use just one rule
'/ip firewall src-nat add dst-address=!address/32:80 protocol=tcp action=redirect to-dst-port=8080'

* I use firewall to block access to the router from the Internet. My proxy does not work.
Make sure you allow established TCP connections with tcp option 'non-syn-only' to the router before blocking everything else. In v2.5, the rule is like this:
'/ip firewall rule input add protocol=tcp tcp-options=non-syn-only connection-state=established'

Bandwidth Management dengan Mikrotik

Misalkan kita mempunyai client sebanyak 10 buah. Link yang kita sewa sebesar 128kbps ke ISP. Kendala yang sering ditemui pada sebuah jaringan adalah tidak ada pembagian bandwidth yang adil diantara client jaringan tersebut. Jika salah satu dari client kita menggunakan program semisal download accelerator atau flashget, niscaya bandwidth yang kita miliki tersebut akan habis oleh satu client saja, sementara client lain jika ingin menggunakan bandwidth menjadi terhambat, karena link yang kita sewa telah saturasi.

Untuk mengatasi itu semua maka diperlukan bandwith management, pada mikrotik ada sebuah fitur PCQ (Per Connection Queue) yaitu mekanisme antrian untuk menyamakan bandwidth yang dipakai oleh multiple client.

Cara kerja PCQ jika hanya satu client yang sedang aktif menggunakan bandwidth sementar yang lain idle, maka client tersebut dapat menggunakan maximal bandwidth yang tersedia, tetapi pada saat client ke dua aktif, maka maximal bandwith yang digunakan oleh kedua client tadi menjadi masing-masing 128kbps /2 , jika ada client lain pada saat bersamaan aktif, maka masing-masing akan mendapat jatah maximal 128kbps /3. Sehingga akan terjadi pembagian bandwidth yang adil untuk seluruh client.
Ada beberapa cara yang bisa digunakan, salah satu nya dengan menggunakan MANGLE atau menandai paket dan membatadi paket berdasarkan tanda (packet-mark) yang telah dibuat.

1. Mark all packets with packet-mark all:

/ip firewall mangle add chain=prerouting action=mark-packet new-packet-mark=all \

passthrough=no

2. Setup two PCQ queue types – one for download and one for upload. dst-address is classifier for user’s download traffic, src-address for upload traffic:

/queue type add name="PCQ_download" kind=pcq pcq-rate=64000 pcq-classifier=dst-address

/queue type add name="PCQ_upload" kind=pcq pcq-rate=32000 pcq-classifier=src-address

3. Finally, two queue rules are required, one for download and one for upload:

/queue tree add parent=global-in queue=PCQ_download packet-mark=all

/queue tree add parent=global-out queue=PCQ_upload packet-mark=all

Share

Twitter Delicious Facebook Digg Stumbleupon Favorites